Loading
2026/08/10
How to restyle an existing video with AI: a practical video-to-video workflow
Turn one existing clip into cinematic, branded, anime, or campaign-ready variants with AI. A practical video-to-video workflow with model guidance, prompts, and a quality-control checklist.
You do not always need to generate a video from scratch.
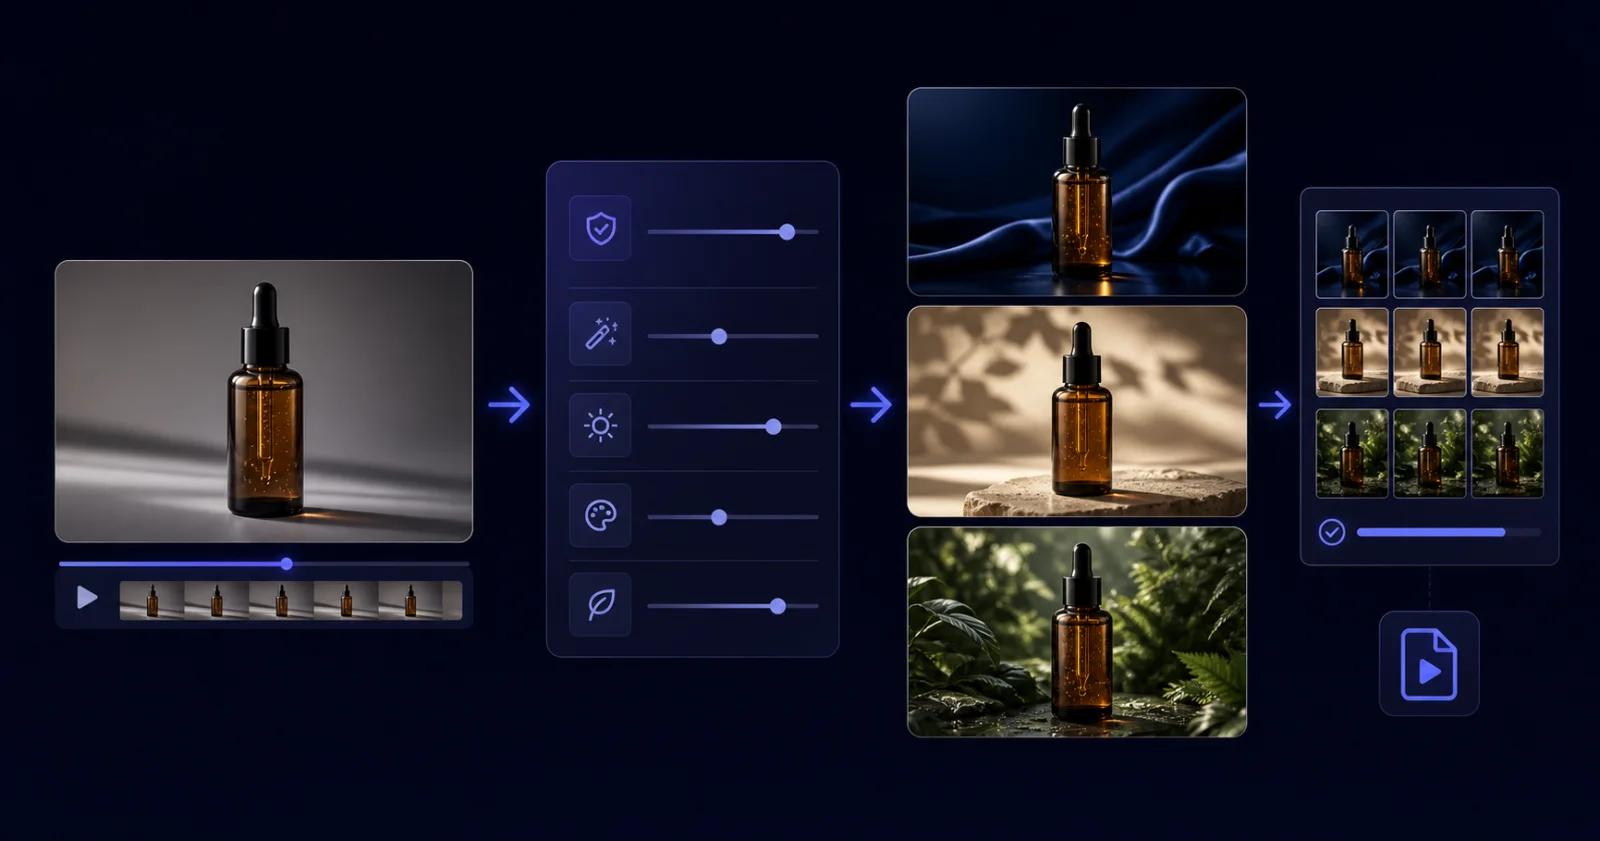
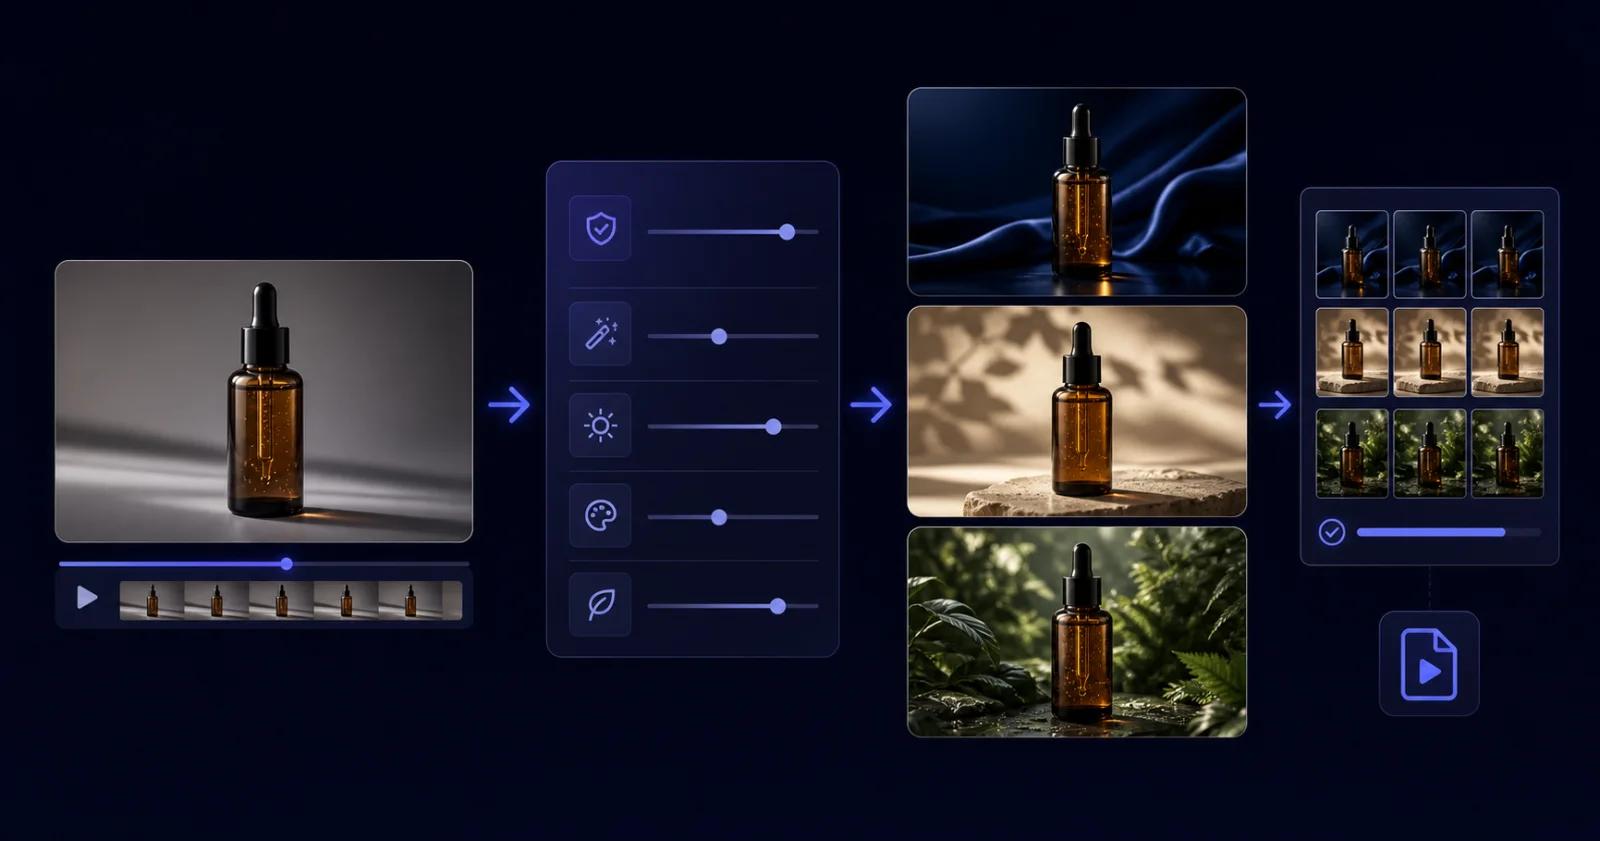
If you already have a clip with the right person, product, timing, or camera movement, rebuilding it with text-to-video throws away the most valuable part: the motion you have already captured. A video-to-video workflow keeps that source footage as the structural reference, then changes its visual treatment with a prompt.
That makes it useful for jobs such as:
- turning neutral phone footage into a cinematic campaign clip;
- creating several visual directions from one product video;
- giving mixed footage a more consistent brand palette;
- converting live-action motion into an illustrated sequence;
- refreshing an older social clip without organizing another shoot.
This guide walks through a controlled workflow inside the ImageToVideoAI video-to-video generator. You will prepare one source clip, choose a suitable model, write a prompt that separates what must stay from what may change, generate a small test, and review the result before publishing.
First, make sure video-to-video is the right tool
Video-to-video is best when the source clip already contains motion worth preserving.
| Starting asset | What you want | Best workflow |
|---|---|---|
| An existing video | Restyle or reinterpret the same motion | Video to Video |
| A still image | Make the subject move | Image to Video |
| No source asset | Create a completely new scene | Text to Video |
| A finished clip | Improve sharpness rather than change the scene | AI Video Upscale |
Mute the clip and watch it once. If the movement, timing, and framing already communicate the idea, use video-to-video. If the underlying shot is wrong, transformation will not fix the directing decision. Start with a new generation or reshoot instead.
The workflow at a glance
| Stage | Decision | Deliverable |
|---|---|---|
| Brief | What stays, and what changes? | One-sentence transformation brief |
| Source preparation | Is the clip simple enough to transform? | One clean source clip under 10MB |
| Model choice | Does the job need restyling, references, or motion control? | One model for the first test |
| Prompting | Can the model separate preservation from transformation? | Four-part prompt |
| Generation | What is the smallest useful experiment? | One short draft in one direction |
| Review | Did style improve without breaking continuity? | Pass/fail QA checklist |
| Iteration | Which single variable changes next? | One revised prompt or model choice |
| Delivery | Where will the clip be viewed? | Final file plus archived settings |
Step 1: write a transformation brief before uploading
Do not begin with a list of visual adjectives. Begin with the parts of the source that have business value.
Use this sentence:
Preserve [subject, action, framing]. Change [lighting, palette, texture, or visual style]. The finished clip should feel [specific reference or mood].
For example:
Preserve the bottle, hand movement, camera angle, and clip timing. Change the lighting to a dark luxury studio look with amber highlights and a charcoal background. The finished clip should feel restrained and premium.
This brief prevents a common mistake: asking the model to change everything at once. “Make it cinematic” gives the model permission to reinterpret the subject, environment, camera, and motion. A useful brief creates boundaries.
Step 2: prepare a source clip the model can follow
The ImageToVideoAI workbench accepts one MP4, MOV/QuickTime, or MKV source video per generation, up to 10MB.
Before uploading:
- Trim to one clear shot. One continuous action is easier to transform than a montage with several cuts.
- Remove empty handles. Cut dead time before the action begins and after it ends.
- Check exposure. If the subject disappears into darkness or clipped highlights, the transformation inherits that ambiguity.
- Prefer a clear subject. Keep the main person, object, or product easy to identify throughout the clip.
- Avoid unnecessary shake. Small handheld movement can work; chaotic movement makes artifacts harder to diagnose.
- Save a clean master. Never overwrite the original footage.
For the first experiment, use the shortest clip that still contains the complete action. A five-second product turn teaches you more than a long edit with multiple scenes.
Step 3: upload the clip and choose a model by input contract
Open the AI Video to Video Generator, draft the prompt, and upload the source clip.
The models in the workspace do not all perform the same job. Use their input requirements to narrow the choice.
| Model family | Start here when | Important input note |
|---|---|---|
| Wan 2.7 | You want a prompt-led restyle with a short source clip | Can use an optional reference image |
| Seedance 2.0 | You want a multimodal transformation | Supports video plus an optional reference image |
| HappyHorse | You need video/reference editing and audio options | Reference image is optional; audio mode may be Auto or Origin |
| Kling 3.0 / 2.6 Motion Control | Source motion should drive a supplied subject image | Reference image required; source video must be 3–30 seconds |
| Wan 2.6 | You want a direct transformation with optional multi-shot behavior | Source clip remains the main input |
These are starting points, not universal rankings. Source material and transformation difficulty matter more than a model name. Keep the source and prompt unchanged when comparing models; otherwise you will not know what caused the difference.
Step 4: decide whether you need a reference image
A reference image helps when words alone cannot describe the target accurately. Add one when you must anchor:
- a specific character or face;
- a product's packaging and color;
- a costume or material treatment;
- a brand palette;
- an illustration or rendering style;
- the subject that should inherit motion in Kling Motion Control.
Skip it when the source video already contains the exact subject and you only need a broad change in lighting, atmosphere, or visual treatment.
In a standard transformation, the video supplies subject and motion. In a reference-assisted transformation, the image supplies an additional visual anchor. In Kling Motion Control, the video supplies motion while the required image supplies the subject that performs it.
Do not add a reference merely because the interface allows one. Use it when it removes ambiguity.
Step 5: write the prompt in four parts
A reliable video-to-video prompt has four jobs:
- Preserve: subject, action, timing, composition.
- Transform: palette, lighting, materials, environment, rendering style.
- Direct: camera stability, pacing, depth, atmosphere.
- Constrain: identity, geometry, logos, text, or object count.
Use this template:
Preserve [subject + original motion + framing]. Transform [specific visual properties]. Use [camera and atmosphere]. Keep [identity and geometry constraints] unchanged.
Cinematic brand treatment
Preserve the actor's movement, timing, facial identity, and medium-shot
framing. Transform the scene into a cinematic night campaign with deep
navy shadows, controlled amber rim light, and subtle atmospheric haze.
Keep the camera movement smooth and restrained. Do not change the clothing
silhouette or facial features.
Product campaign variant
Preserve the bottle shape, label placement, hand movement, and original
camera path. Replace the neutral room lighting with a premium studio setup:
charcoal background, soft gold edge light, crisp glass reflections, and
shallow depth of field. Keep packaging text, proportions, and cap geometry
unchanged.
Illustrated social version
Preserve the original body movement and timing. Convert the footage into
clean editorial animation with soft ink outlines, limited coral and navy
colors, subtle paper texture, and stable facial features. Keep the original
framing and avoid adding new objects.
Brand normalization
Preserve the people, dialogue timing, gestures, and shot composition. Unify
the footage to a warm natural brand palette with soft contrast, neutral skin
tones, desaturated backgrounds, and consistent window light. Keep faces,
clothing, and room geometry unchanged.
“Epic, viral, beautiful, professional, cinematic, 8K” does not give the model a hierarchy. Specific visual decisions do. For more control over shot language, use the AI video camera movement guide.
Step 6: generate one controlled test
For the first draft:
- choose one model;
- use one source video;
- test one visual direction;
- keep the prompt short enough to diagnose;
- avoid changing style, camera, pacing, and identity at the same time.
Write down three things before pressing Generate:
- What must survive unchanged?
- What is the one visible transformation?
- What would make the result unusable?
Example:
- Must survive: bottle label and hand path.
- Transformation: daylight kitchen to dark premium studio.
- Failure condition: label melts or bottle proportions change.
This turns “Do I like it?” into a review you can repeat.
Step 7: review the output like an editor
Watch the result once at normal speed, once muted, and once frame by frame around the most complex motion.
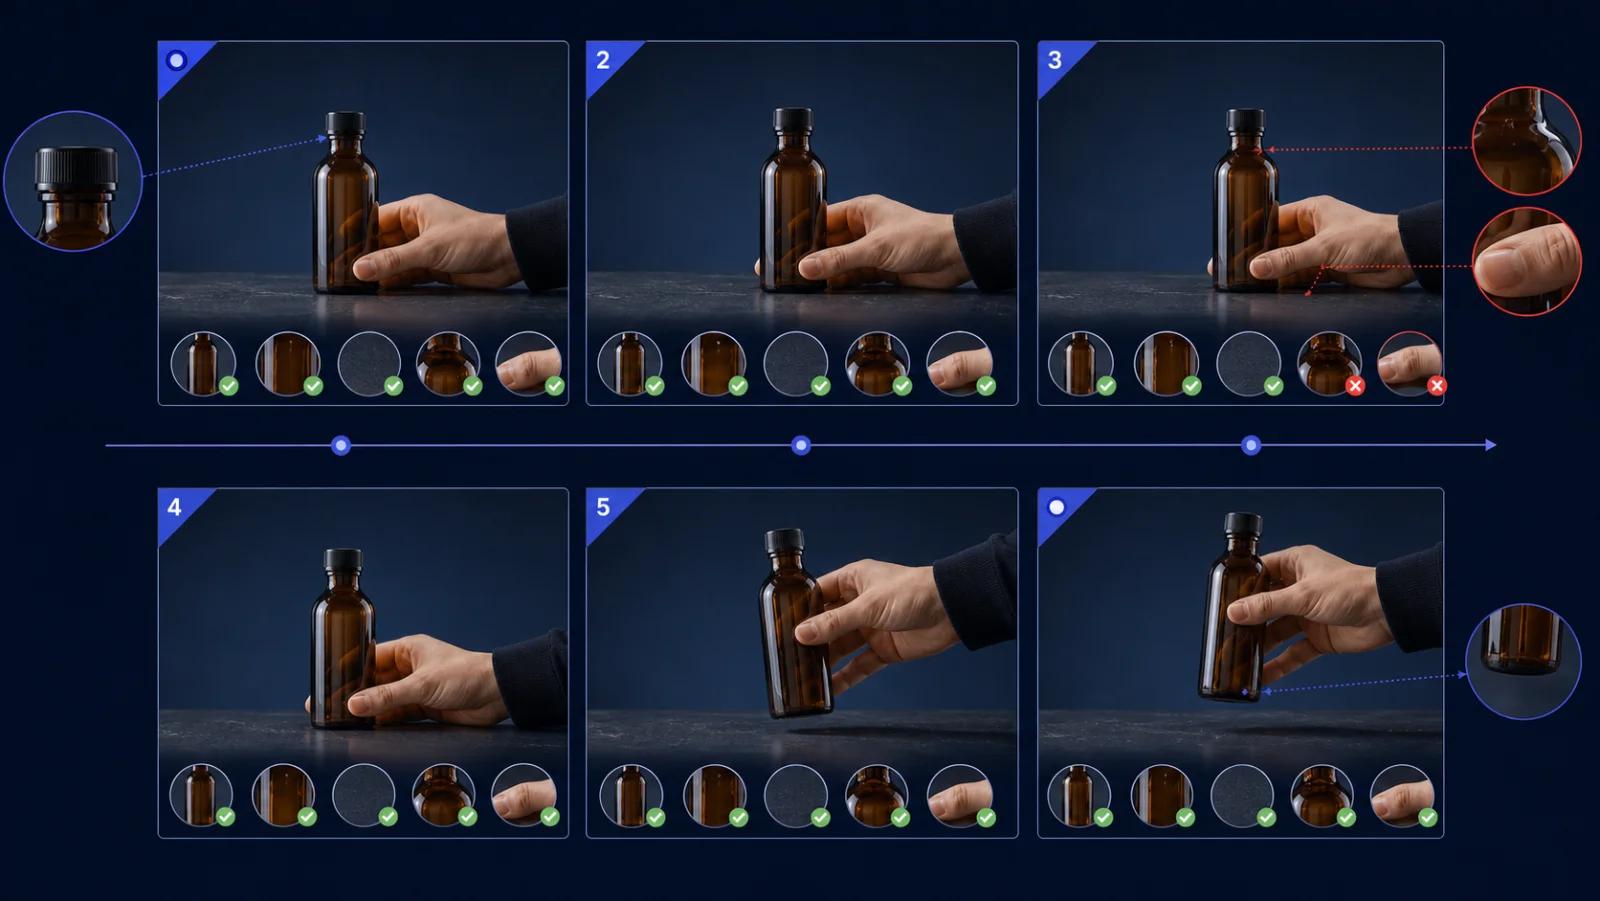
Subject continuity
- Does the face or product remain recognizable?
- Do clothing, packaging, and object colors stay consistent?
- Does anything appear or disappear between frames?
Motion continuity
- Does the original action still read clearly?
- Do hands, limbs, wheels, or moving edges remain connected?
- Does the subject slide independently of the floor or background?
Scene geometry
- Do walls, furniture, product edges, and horizons remain stable?
- Does the background pulse or bend when the camera moves?
- Are reflections and shadows moving in a believable direction?
Brand-critical details
- Is the logo still legible?
- Has packaging text changed?
- Are required colors close enough to the intended palette?
Edit readiness
- Are the first and last frames usable for a cut?
- Is there a clean moment for an on-screen title?
- Does the output still work when cropped for the intended channel?
- If audio is present, does it match the publishing plan?
If you find an artifact, use the AI video artifact troubleshooting guide before spending credits on random retries.
Step 8: change one variable per retry
| Problem | First change to test |
|---|---|
| Subject identity drifts | Move the identity constraint to the first sentence or add a clean reference image |
| Product shape changes | Remove environment changes and explicitly preserve proportions and edges |
| Background flickers | Simplify texture language and request a stable background |
| Result barely changes | Replace broad adjectives with concrete lighting, palette, and material instructions |
| Motion becomes exaggerated | Add “preserve original motion path and timing” |
| Camera movement changes | Add “keep original framing and camera path” |
| Style is right but details break | Transform fewer visual properties |
| Every retry fails at one frame | Trim the source or switch models rather than adding more prompt text |
Keep an experiment log:
| Version | Model | Single change | Result |
|---|---|---|---|
| A | Wan 2.7 | Baseline prompt | Good palette, weak label |
| B | Wan 2.7 | Packaging constraint | Label improved |
| C | Seedance 2.0 | Same prompt and source | Better motion, different texture |
Without a record, it is easy to repeat failed prompts or lose the strongest result.
A practical 30-minute project: three ad directions from one clip
Suppose you have a five-second product clip: a hand places a skincare bottle on a table.
Minutes 0–5: prepare
Trim the clip to the hand entering, placing the bottle, and leaving. Confirm the file is below 10MB.
Write the invariant:
Bottle shape, label, hand movement, camera angle, and timing stay unchanged.
Minutes 5–10: generate the control
Preserve the bottle, label, hand movement, framing, and original timing.
Improve the lighting with soft commercial highlights and a clean neutral
background. Keep packaging geometry and text unchanged.
This establishes whether the source transforms cleanly.
Minutes 10–20: create two deliberate variants
Luxury version
Preserve the bottle, label, hand movement, framing, and timing. Transform
the scene into a dark luxury studio with charcoal surfaces, warm gold edge
light, controlled reflections, and shallow depth of field. Keep packaging
text and proportions unchanged.
Fresh botanical version
Preserve the bottle, label, hand movement, framing, and timing. Transform
the setting into a bright botanical campaign with soft morning light, pale
stone, subtle leaf shadows, and fresh green accents. Keep packaging text,
cap shape, and bottle proportions unchanged.
Minutes 20–30: review and export
Compare the control, luxury, and botanical versions using the same checklist. Choose by campaign job, not dramatic effect. After signing in, keep the generation details in dashboard history so the next variant begins from a known decision.
What video-to-video cannot reliably fix
It cannot guarantee:
- perfect preservation of small text or logos;
- repair of severe motion blur;
- natural reconstruction of a subject hidden for most of the clip;
- removal of every jump cut in a montage;
- exact legal color matching without a finishing pass;
- consistent results from footage whose subject changes constantly.
For a client or paid campaign, treat the generated clip as production material, not unquestionable final output. Review important text, identity, product claims, and brand assets before delivery. The AI video client review workflow can reduce confusing file versions.
Final checklist
Before generating:
- One source clip, below 10MB.
- One continuous action.
- Clear subject and usable exposure.
- Written preserve/change brief.
- Model chosen for the required input type.
- Reference image added only when it removes ambiguity.
Before publishing:
- Identity or product geometry stays consistent.
- Original motion still reads correctly.
- No unacceptable edge, hand, reflection, or background artifacts.
- Logos and text have been checked.
- First and last frames are edit-safe.
- Audio treatment is intentional.
- Output has been reviewed in the final destination format.
The fastest video-to-video workflow is not the one with the longest prompt. It is the one where every generation answers a specific question.
Start with one clean clip, preserve what already works, transform one visual layer, and review the result like an editor. Create your first video-to-video transformation →
Author

Categories
First, make sure video-to-video is the right toolThe workflow at a glanceStep 1: write a transformation brief before uploadingStep 2: prepare a source clip the model can followStep 3: upload the clip and choose a model by input contractStep 4: decide whether you need a reference imageStep 5: write the prompt in four partsCinematic brand treatmentProduct campaign variantIllustrated social versionBrand normalizationStep 6: generate one controlled testStep 7: review the output like an editorSubject continuityMotion continuityScene geometryBrand-critical detailsEdit readinessStep 8: change one variable per retryA practical 30-minute project: three ad directions from one clipMinutes 0–5: prepareMinutes 5–10: generate the controlMinutes 10–20: create two deliberate variantsMinutes 20–30: review and exportWhat video-to-video cannot reliably fixFinal checklist
More Posts
Veo 3.1 reference image workflow: keep subjects consistent across clips
A practical Veo 3.1 reference image workflow for image-to-video creators — how to pick reference frames, write prompts, and stack clips without losing your subject.
Fashion Photo to Video AI: Lookbooks, Reels & Product Pages
Turn fashion photos into usable motion clips with source-image checks, garment-safe prompts, aspect-ratio planning, frame QA, and batch production tips.
40 tekoälypromptia kuva videoksi – kopioi ja liitä suoraan (2026)
Valmis kirjasto 40 image-to-video-promptista muotokuville, tuotteille, kiinteistöille, lemmikeille ja elokuvamaisille kuvakulmille – plus ohjeet omien promptien kirjoittamiseen ImageToVideoAI:ssa.
Newsletter
Join the community
Subscribe to our newsletter for the latest news and updates